Looped Resistance Band Full-Body Workout
Get ready to strengthen, tone, and stabilize your body with this looped resistance band workout designed to challenge your core, improve balance, and build endurance. This session is packed with controlled movements that engage all major muscle groups—abs, back, glutes, legs, and arms—for a full-body sculpt.
Each move includes two intensity levels:
Level 1: Ideal for those who prefer a more moderate pace or are just getting familiar with resistance bands (lighter resistance or bodyweight options available).
Level 2: Perfect for those looking to elevate their workout with deeper movements, stronger resistance, and more advanced variations.
We’ve carefully selected exercises like crab walks, standing leg abductions, and squat pulses, combined with functional moves like glute bridges, pushups, and overhead outward pushes, all incorporating resistance bands to challenge your strength, stability, and flexibility. With clear demonstrations, safety tips, and modifications, you’ll avoid injury while maximizing each move.
As a suggestion for a 15-minute strength training routine, perform each of our movements for 45 seconds and give yourself a 15-second rest before moving on. For a 30-minute strength training routine, repeat each movement twice before moving to the next!
Warm up, pick your level, and let’s dive into this energizing looped resistance band full-body workout!
We also offer this workout in person at our studio—book your first class for free!
Crab Walks
Safety precaution
Keep your chest lifted, core tight, and maintain tension on the resistance band. Ensure your knees stay slightly bent and do not collapse inward.
Main muscle groups worked
Glutes, Quads, Core
Level 1 (Use a lighter band if needed) & 2
Starting Position:
Begin in a low squat position, feet hip-width apart, with a resistance band above your ankles.
Keep your hands in front of your chest for balance.
Crab Walk:
Step laterally with your right foot, keeping tension on the band, then follow with your left foot.
Continue moving sideways 4 times, then reverse direction 4 times, leading with your left foot.
Stay low in the squat and maintain a steady, controlled pace throughout the movement.
2. Standing Leg Abductions (Right & Left)
*One side at a time
Safety precaution
Keep your toes pointed, and maintain a slight bend in your knees for balance and stability
Main muscle groups worked
Core, Hip mobility, stability
Level 1 (Toe taps)
Starting Position:
Standing with shoulder width apart, band around ankles, slight bend in your knees
Standing Leg Abductions:
With your right leg, tap your toe to the side
Bring your foot back to the center with control
Level 2 (Leg raises)
Starting Position:
Standing with shoulder width apart, band around ankles, slight bend in your knees
Standing Leg Abductions:
With your right leg, raise your foot to the side until you feel resistance from the band
Lower your leg to the center with control
*Repeat on the other leg
3. Standing Hip Abductions (Right & Left)
*One side at a time
Safety precaution
Keep your core tight, avoid leaning forward, and control the movement to protect your lower back. Hold onto a stable surface for balance if needed.
Main muscle groups worked
Glutes, Hip Extensors, Core
Level 1 (Toe taps)
Starting Position:
Stand tall with your feet hip-width apart and a resistance band placed just above your ankles.
Shift your weight onto your left leg.
Standing Hip Abductions:
Tap your right toe behind you and keep your core engaged while maintaining tension on the resistance band.
Bring your toe back to the starting position.
Level 2 (Leg raises)
Starting Position:
Stand tall with your feet hip-width apart and a resistance band placed just above your ankles.
Shift your weight onto your left leg.
Standing Hip Abductions:
Keeping your core engaged, lift your right leg straight against the resistance band while squeezing your glutes.
Lower your leg back down to the starting position.
*Repeat on the other leg
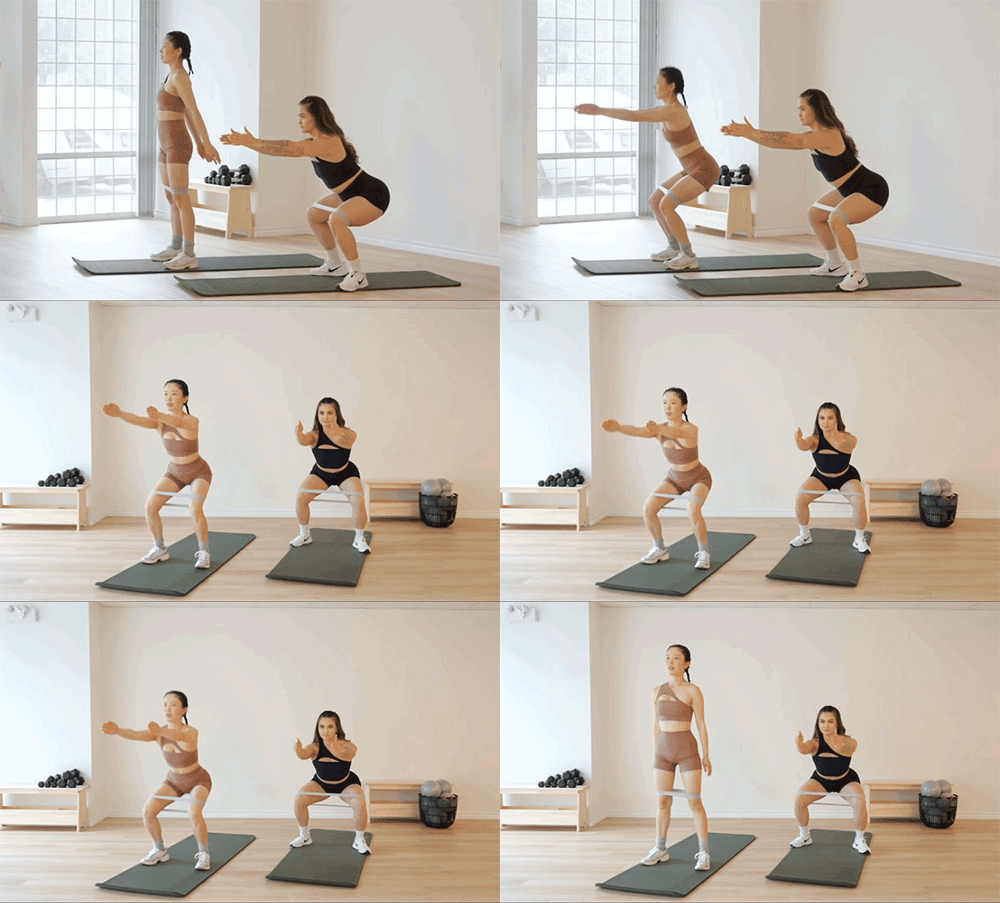
4. Squat Pulses
Safety precaution
Avoid knees caving in, knees in line with toes, chest up, don’t round your shoulders
Main muscle groups worked
Quads, Hamstrings, Glutes, Calves
Level 1 (3 pulses)
Starting Position:
Standing with your feet slightly wider than shoulder-width apart, toes pointing outward
The band placed just above your knees
Squat pulses:
Lower your body into a squat position
Bounce your body 3 times with minimal movement (around 1 - 2 inches) while remaining in the squat position
Raise your arms chest height with locked elbows as you squat
Stand up straight and squeeze your glutes while standing
Level 2 (Continuous)
Starting Position:
Standing with your feet slightly wider than shoulder-width apart, toes pointing outward
The band placed just above your knees
Squat pulses:
Lower your body into a squat position
Bounce your body continuously with minimal movement (around 1 - 2 inches) while remaining in the squat position
Raise your arms chest height with locked elbows as you squat
5. Bicycle Crunches
Safety precaution
Keep your lower back pressed into the mat and don’t pull on your neck. Move in a controlled manner to avoid straining your back.
Main muscle groups worked
Abdominals, Obliques, Hip Flexors
Level 1 (Use a lighter band if needed) & 2
Starting Position:
Lie on your back on a mat with your knees bent and feet flat on the floor.
Put the resistance band on the balls of your feet.
Place your hands behind your head without pulling on your neck.
Bicycle Crunch:
Engage your core and lift your shoulder blades off the mat.
Bring your right elbow towards your left knee while extending your right leg straight out.
Switch sides, bringing your left elbow towards your right knee while extending your left leg.
6. Glute Bridges
Safety precaution
Engage your core and avoid arching your lower back. Keep the resistance band above your knees and feet flat on the floor.
Main muscle groups worked
Glutes, Hamstrings, Quads, Hip Abductors, Core
Level 1 (With pulses)
Starting Position:
Lie on your back on a mat with your knees bent and feet flat on the floor, hip-width apart.
Place a resistance band just above your knees and keep your arms at your sides.
Glute Bridge with Pulses:
Press through your heels and lift your hips off the ground, squeezing your glutes at the top.
Perform 3 small pulses at the top of the movement, pushing against the resistance band.
Lower your hips back down to the starting position.
Level 2 (With knee abduction)
Starting Position:
Lie on your back on a mat with your knees bent and feet flat on the floor, hip-width apart.
Place a resistance band just above your knees.
Glute Bridge with Knee Abduction:
Press through your heels and lift your hips off the ground, squeezing your glutes at the top.
At the top of the glute bridge, push your knees outward against the resistance band, engaging your outer glutes and hips.
Hold for a moment at the top, then lower your hips back down to the starting position.
7. Clams (Right & Left)
*One side at a time
Safety precaution
Keep your core engaged and avoid rolling your hips backward.
Main muscle groups worked
Glutes, Hip Abductors, Core
Level 1 (Use a lighter band if needed) & 2
Starting Position:
Place the resistance band just above your knees.
Lie on your side on a mat with your knees bent at a 90-degree angle, and feet together.
One hand rests on your hip while the other lays flat on the mat for support.
Clam Exercise:
Keeping your feet together, lift your top knee as high as you can while keeping your hips stacked.
Hold for a moment at the top, then lower your knee back down to the starting position.
8. Pushups
Safety precaution
Keep your core engaged and avoid rolling your hips backward.
Main muscle groups worked
Chest, Shoulders, Triceps, Core, Glutes
Level 1 (Knees on the mat)
Starting Position:
Kneel on a mat with your knees on the ground and feet lifted off the floor.
Position the resistance band around your upper arms.
Place your hands on the mat slightly wider than shoulder-width apart.
Pushup:
Keeping your body in a straight line from your knees to your shoulders, lower your chest towards the mat.
Push back up to the starting position, feeling the resistance from the band.
Level 2 (Regular pushup)
Starting Position:
Assume a plank position on a mat with your feet hip-width apart.
Place the resistance band around your upper back and secure it above your elbows.
Your hands should be slightly wider than shoulder-width apart.
Pushup:
Keeping your body in a straight line from head to heels, lower your chest towards the mat while engaging your core.
Push back up to the starting position against the resistance of the band.
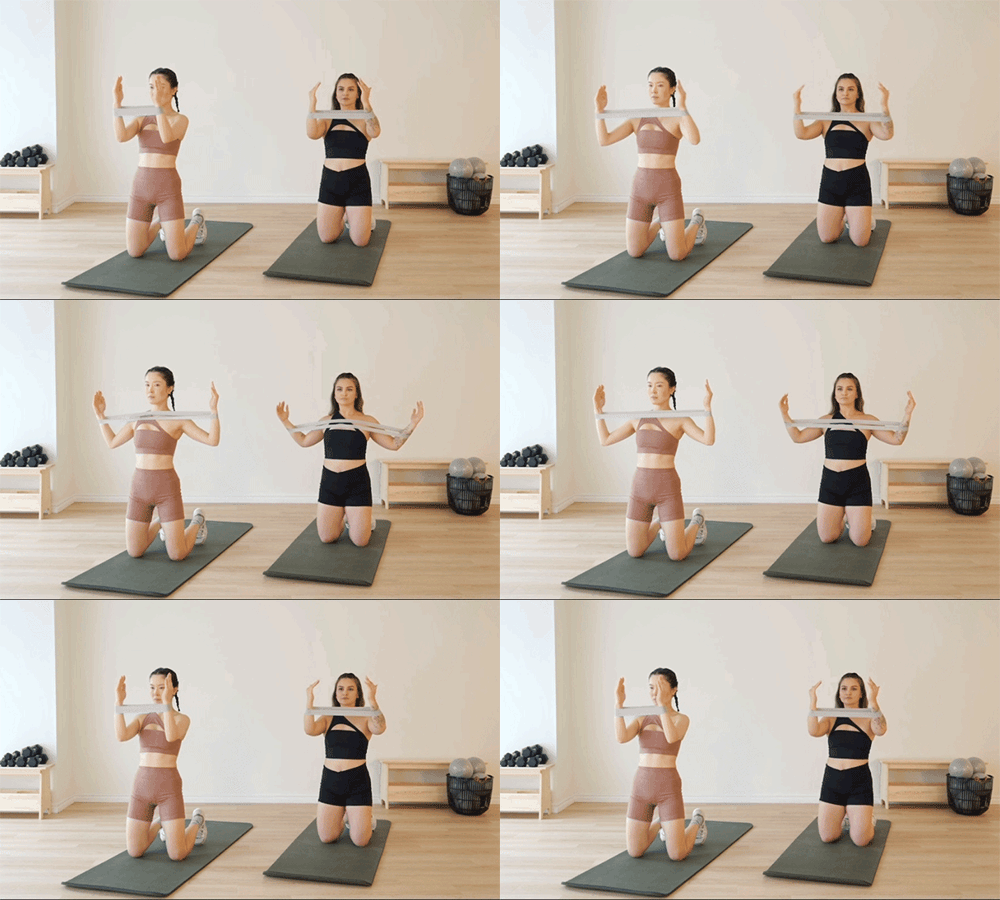
9. Scapular Retraction
Safety precaution
Avoid pulling your arms further than your head, keep your spine neutral, remember to squeeze your shoulder blades together
Main muscle groups worked
Upper Back, Shoulders
Level 1 (Use a lighter band if needed) & 2
Starting Position:
On your knees, arms are bent at the elbow at 90 degrees in front of your body
Band placed around your wrists
Scapular Retraction:
Separate your arms to the side and squeeze your shoulder blades together
Pull your arms back until you feel a tight resistance
Bring arms back to centre with control
10. Overhead Outward Push
Safety precaution
Keep your spine neutral, remember to squeeze your shoulder blades together, move with control
Main muscle groups worked
Upper Back, Shoulders
Level 1 (Use a lighter band if needed) & 2
Starting Position:
On your knees, arms are bent at the elbow at 90 degrees separated in front of your body
Band placed around your palms
Overhead Outward Push
Create tension in the band but pushing it outward with the back of your hands
While maintaining that tension, move your arms overhead and bring them back down to centre
Move your arms slow and controlled
11. Triceps
*One side at a time
Safety precaution
Keep your elbow in tight, don’t overextend your arm, keep a hinge on your hip
Main muscle groups worked
Triceps, upper body, core
Level 1 (Use a lighter band if needed) & 2
Starting Position:
Standing with feet shoulder-width apart, knees slightly bet with a hinge forward on your hip
Place the band on your right shoulder, holding it in place with your left hand
Hold on to the bottom portion of the band with your right hand
Triceps:
Keeping your elbow tight against your body, use your right hand to pull the band toward your hip
With control, bring your arm back up to a 90-degree bend
*Repeat on the other arm
Great job completing the looped resistance band full-body workout! You’ve just powered through a full-body session that engaged your core, activated your shoulders, arms, glutes, and legs, and built strength and flexibility. Using looped resistance bands, you’ve improved your muscle endurance, enhanced stability, and boosted your overall strength.
Take a moment to cool down, stretch, and appreciate your effort. Keep up the great work, and we’ll see you in the next workout!
If you’re looking for more variety or want to target different muscle groups, be sure to explore the other routines available on our site. We've got plenty of workouts to keep you motivated and help you achieve your fitness goals. Stay tuned for more exciting exercises and tips to keep your fitness journey going strong!
Ready to join us in the studio? Book a class now—your first class is on us!


